

CHIA WEI PINK
Architecture Portfolio
Computer Applications project 1 :
Modelling of an Architectural Design
In this project, i have chosen to model my retreat house's design from my 2nd semester final.
In this project, i do not use Autodesk AutoCad and Rhinoceros, Due to the curvy form of my design, i doesn't have to do it with AutoCad. The software that i used is Autodesk "3D max"!

From what i had learned from the previous tutorials, i learned how to apply modifier such as :
- edit poly
- materials selections
- renderer machines


2nd semester retreat house design
Process of modelling

Firstly, in the benning of this project, i am struggling with the curvy form of my design. But i m willing to take the challenge, thus, rother than just tutorials in school, i did ecplore some on myself about how to model curvy objects. So, with the help of youtube tutorials,
i learned other 2 modifier :
- Bent
-Twist
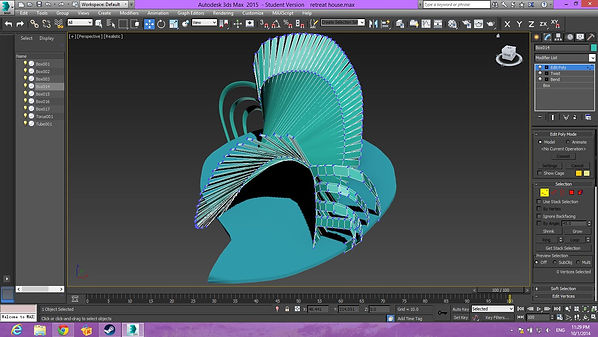
i first start with creating a box in 3DS max without the need to import plans and elevations from autocad. On the box itself i increases the the length segments for further distort purposes.
After that, i apply twist on the box and twist towards axis-Y. As you can see from the above picture.

After the twisted piece being created, i placed it on the require platform/ floor plan of my design.
By refering to my design, i slowly change the form by moving the vertex point towards the location i want.

After that, becaused i already created many segments in the begining. Thus, i extrude each small segment from the side using polygons. i make each strap from time to time by moving and rotating.

This is the look, after i done my modify with the staps and platform. i change the color to be more obvious.

Futher move on, i was to create the other chamber of my design which is the bedroom. At first, i do not know what to do. After a while, i start to play around with "Bent" i created a rectangle and bent it to the axis i want and . it come out with the shape like the picture above. Unfortunately, that is not what i want.

Afterthat, i try to extrude the twisted piece like the picture above.

And i started to apply polygons from the side and extude it. i added several segments to it, and i use vertex to make it look like a circular structure. Beside that, i make the same to the rest until it look completed.
After it's completed, i apply the same to the other side

In order to smoothen the surface to make it look more curvy , i leaned to apply " turbo smooth" to my the structures with the literations. Until it look smooth. I had also apply to the other side the model.

After all the chambers on each sides had been done. i started to make wall and doors for my design.

In order to make the shape to cover my circular pillar. I created a cylinder and apply vertex and toggle to make it enclose with the pillar.

After that, i created the other chambers / interior wall in the building. Using box and agains i added many segments to it for distortion. After i changed the shape of it and i place it inside the model and slowly ajjust each segment to the require height by using toggle.

Eventually, i make a door hole for each entrance , make it easier for lately projects.
Appearance After rendering
 |  |  |  |  |  |
|---|
Project 2 :
Rendering with Materials, Lights, Camera Views
with Site Context
In this project, it involves the production of photorealistic still rendering of the selected architecture design
with materials, appropriate camera views and post-production enhancement on the visual outcome. The
visualisation work would be assessed on the types and ways materials are used, types of lights and effects used
to set up the scene, setup of appropriate camera views for rendering and skills of using post-production tools to
enhance the visual outcome

Firstly, i search a " earth contour " from google.
This is where i learned from youtube tutorial.
i insert this to the plane that i created, i set it to many segments. And i make the site map according the method i learned from youtube which is making to make the gound follows the texture of the site map that i downloaded.

This is the effect of the ground that i tested rendering with. It shows slight irregularity.
The water and the sky, which i turn on the daylight mode in the modifier and make it to manual so that i could move it around.
I also turn on the Mr Sky and Mr Sun in the mode for the visual enhancement.
The water that created by using a plane and change the materials properties to the " mental rays" - water element .

After the contour has been done modified. I started to put in mateials that i got from google.
After i change the materials properties by inserting picture from google.
I applied uvw map by making them to the scale for better visual purpose ... so that it looks real.

This is the other test rendering after applying the UVW map.
 images.jpg |
|---|
 images (4).jpg |
 images (3).jpg |
 images (1).jpg |
 decking_preview_05.jpg6c910b1e-b001-4f19-973d-a363043c1d10Large.jpg |
Materials selections
Create realistic grass

I know there is ways of creating grass in 3ds max that uses :
- hair and fur
- grass generator
but i use the other method which is creating grass on my own with like 5 pieces of grass and clone to make it twice the volume . Then i started to find solutions from youtube. Eventually i downloaded a file call " advanced painter" , this extracted files enable me to paint my grass randomly all over the spaces that i wanted and does not cause any lag in my com.
create realistic trees
For the trees, i know there is the fixed and convenient trees that we can pick in 3ds max. But it doesn' t look realistic. thus, i found a way which is a websites that i can download different types of trees that already made and it looks real. i download the files with some textures pictures. And i just add into the project with around 20 of them with the leaves it self, 2 different materials.
Scene After render


Project 2B:
Still Rendering with Materials, Lights, Camera Views with Site Context (50%)
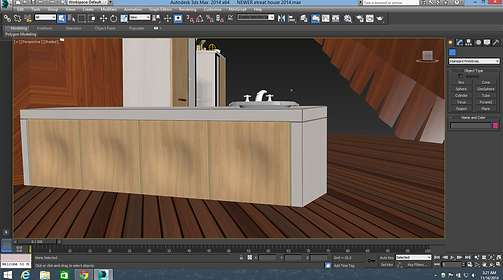


Firstly, i added in furnitures in 1 of my interior from "achive3d.net"
after putting materials , i added the texture from google and i select 1 by 1 and set their UVW map.
I started to insert lamp into my interior .
And i started to put in other furnitures in the other room.
after adjust and place all the furnitures, i started to create the interior lighting by creating light and control camera lens and distance.
Setting camera lens and distance
Final appearance


Project 3: A maximum 90 seconds Animation of the Completed
3D Scene (30%)
Submission date: Week 15 (8 Dec 2014)
Introduction
This project involves production of a maximum 90 seconds animation of the completed 3D scene using 3DS
Max’s animation commands and tools. It also involves simple video editing work such as stitching video clips,
background music & special effects editing, through the use of Windows Movie Maker, iMovie, Adobe Premiere
and After Affects.
Progress
In this project, i used Adobe Premiere, Adobe After Effect, 3ds max to make this video. I started with downloading images texture that suit my theme. And after watching tutorials from youtube, i started with renderings with 3ds Max by setting 3 camera path each path about 20 seconds and then import them into after effects to make some falling flower effects. Beside that, i used after effects to create texts for the opening and the end. The whole video itself, i created using adobe premiere and music are from youtube.


